Easy process to configure L2TP VPN server in Mikrotik router.
In this tutorial, We can see how easily configure and deploy L2TP VPN server in Mikrotik router.This is a easy process we can see step by step how to it configure.
Step 1. Create a IP Pool.
Step 2: Create PPP Profile for L2TP.
Step 3: L2TP VPN Server configure
Step 4: Create user Secret for L2TP.
Lets consider the following Diagram for complete all these steps.
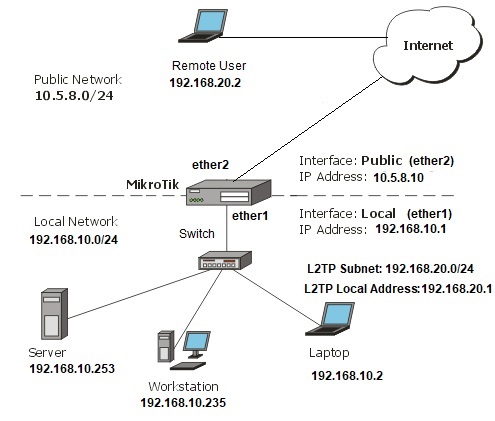
Here, Remote user is using ip 192.168.20.2 which can connect with L2TP VPN and connected with local network of 192.168.20.0/24 and 192.168.10.0/24. L2TP Local Address is 192.168.20.1.
Make sure that all this local block or subnet can NAT or src-nat in router through a public IP (here ip 10.5.8.10)
First Login to the Mikrotik Router via Winbox and click IP then Pool:

Click on the “+ Symbol” to add new pool, Name will be whatever you want like I named it VPN_Pool_20 add the address range (192.168.20.2-192.168.20.30, in my case), then click OK.

Now on the PPP page, switch to the “Profiles” tab. Click on the + sign to create new profile, Name will be whatever you like (like I use VPN-POOL), set local address 192.168.20.1 and set pool that we have created earlier for Remote address and set DNS Server address here we are using 8.8.8.8 then click OK.

Now go to the PPP Section click on Interface and Click “L2TP Server” and check the Enabled then in Default Profile select default or default-encryption or your created any profile.here we are using VPN-POOL then Checked all authentication protocol (chap,pap,mschap2,mschap1) and finally if you are want to use ipsec over L2TP you can select yes in Use IPsec tab and put a IPsec Secret key here we use abc123abc you can use whatever u want.But if you don’t want to use IPsec you can select no.

L2TP configuration has done now we will create user from Secrets tab. click on the “Secrets” tab of the PPP window. Click on the + sign to create new user, add the name(which act as username), password and service may be any or l2tp and profile that we have created in the previous step.

L2TP Client Setup on Remote User laptop Windows 10:
I would like to request to visit https://net-ship.blogspot.com/2020/04/vpn-client-setup-in-windows.html blog to configure step by step any VPN client in Windows System including PPTP, L2TP etc.
VPN configuration in MikroTik
ReplyDeleteI truly adored reading your posting. the vpn connection failed due to unsuccessful domain name resolution
ReplyDelete